Database Routing Approach: Using pgRouting and PostGIS for Indoor Navigation
Posted on June 1, 2024 • 10 min read • 1,928 wordspgRouting for Indoor Pathfinding with our Step-by-Step Guide on Creating Walkable Routes

pgRouting and PostGIS for Geospatial Routing
Routing is a widely used technology for numerous geospatial applications, from logistics management to urban planning. pgRouting is an open-source extension of the PostGIS/PostgreSQL geospatial database that offers a wide range of routing functionalities. In this blog post, we divided the indoor mapping case study into 3 sections: installation guide, where we explain a step-by-step guide on how to install PostgreSQL and its extensions for geospatial data and routing, SQL commands to create the walkable routes and network topology and visualisations in QGIS from SQL commands.
What is pgRouting?
pgRouting stands for “PostgreSQL Routing. It extends the capabilities of PostGIS/PostgreSQL and allows users for advanced routing operations. With pgRouting, users can solve complex network analysis tasks such as finding the shortest path between two points or solving the Travelling Salesman Problem (TSP).
The library includes a wide range of features:
Shortest Path Algorithms: Including A*, Dijkstra and bidirectional variants for efficient pathfinding.
All Pairs Shortest Path: Floyd-Warshall and Johnson’s Algorithm for network-wide path computations.
Travelling Salesman (TSP): To find the optimal route that visits a set of locations.
Turn Restriction Shortest Path (TRSP): For real-world scenarios where turns are restricted.
- Driving Distance: To calculate reachable areas based on distance or time.
pgRouting comes with several advantages:
User interactivity will be immediately reflected in the routing output. On the fly route calculation, routing is based on current data.
Cost can be calculated using multiple fields and tables.
Community and organisation support: Users can contribute to the project, report issues, or seek help through the mailing list and GIS StackExchange. Commercial support is also available for those requiring professional assistance.
Which algorithms are supported by pgRouting?
Common routing algorithms used in indoor mapping include:
Dijkstra’s Algorithm: This is a classic algorithm for finding the shortest paths between nodes in a graph, which may represent road networks. It’s often used when the graph is not too large and when all edge weights are non-negative.
A __Algorithm:__* An extension of Dijkstra’s, A* is used when you have additional information to guide the search, such as heuristics that estimate the distance to the goal. This makes it more efficient, especially for larger graphs.
Bellman-Ford Algorithm: Useful for graphs with negative edge weights, this algorithm can handle more complex routing scenarios but is slower than Dijkstra’s and A* for graphs without negative weights.
Floyd-Warshall Algorithm: This algorithm computes shortest paths between all pairs of nodes, which can be useful for precomputing routes or when multiple routing requests will be made within the same network.
The choice of algorithm depends on the specific requirements of the indoor mapping task, such as the size and complexity of the building layout, the presence of obstacles and the need for real-time routing.
Installation
Before we start with setting up routing, make sure following are installed
PostgreSQL: Relational Geospatial Database System
PostGIS: extension for PostgreSQL that spatially enables the DB
(gives a set of spatial functions and provides new geometry data types)
pgRouting: extension for routing and other network functionalities
QGIS: GIS software for data visualisation
Please follow the guide below if you haven’t installed those.
Windows or MAC :
Download PostgreSQL from here: https://www.postgresql.org/download/
Download PostgreSQL GUI (PgAdmin, Postico, DBeaver etc)
Add extensions (easily done once you got your db set up)
Download QGIS from here: https://qgis.org/en/site/forusers/download.html (use the latest stable version)
Once you have local PostgreSQL running and extensions enabled, continue with the Main task setup instructions.
How to install PostgreSQL on Mac OS X:
For Mac we can use a command line tool to call Homebrew to install the
Software (https://brew.sh/) run:
/usr/bin/ruby -e "$(curl -fsSL https://raw.githubusercontent.com/Homebrew/ install/master/install)"Paste that into Terminal (Application/Utilities/Terminal) and run. Then it is always good to do an update, so in terminal run:
brew updateThen do:
brew install postgresThen do
brew install postgisNote that after each step above, it will now run and install. It will print long messages on the terminal and it can take a few minutes per command.
Now start the postgresql server by running the command below:
pg_ctl -D /usr/local/var/postgres -l /usr/local/var/postgres/server.log startThis bit is probably the trickiest where things are most likely to go wrong. Once run it simply prints ‘server starting’ to the screen.
You can then run the command again but change the last word from ‘start’ to ‘status’. This should print something like:
pg_ctl: server is running (PID: 8381)(PID will be different than above)
Well done, it’s all set
Main task setup instructions (Mac or Windows)
For the next bit there are a few tools you can use. You can choose to do everything from the command line PSQL tool but most people prefer to use a GUI.
The most widely used one for postgres is called pgAdmin: https://www.pgadmin.org/download/
Before setting up routing, we need to create a server, a database instance and add extensions.
To do this:
Open pgAdmin
Right click (or ctrl click) on Servers and select Create -> Server
In the ‘General’ tab type ‘localhost’ in the name box
In the ‘Connection’ tab type ‘localhost’ into the Host name/address box. The port and username are set default by pgadmin
Hit ’Save’
Next create the database inside the server. Right click the ‘localhost’
connection -> Create -> Database
In the new dialog box that pops up, name the Database as you like, example mydb.
Hit ‘Save’
Now in the tree drop down in pgAdmin you can see Servers -> localhost -> Databases -> mydb
- Now, you can spatially enable the new database by adding the extensions.
Through GUI or by SQL executing:
CREATE EXTENSION postgis;- Next, create a ‘schema’ in mydb
Easy to follow structure allows users to manage databases effectively.
By default, structure should look like this:
Servers
Databases
Schemas
Tables
When the PostGIS extension is added, a table called ‘spatial_ref_sys’ will appear in the public schema.
Generally, the public schema is not used, so we now need to create a new schema to create a table later. This can be done in the GUI also (Right click at the database level and select “Create Schema” or using SQL:
- From the Tools drop down select ‘Query Tool’. In the new query window panel, run the query below:
CREATE SCHEMA myschema;- Hit ‘Save’
Now everything is ready, we can start using PostGIS to sort out data and set up our routing algorithm.
Routing Through an Indoor Space
Our case study includes creating a routing network which traverses the walkable space for one floor of a complex indoor building with the materials provided
Furthermore, we will extract routes which traverse the network between the points-of-interest (POI) supplied.
We’ll do this using PostgreSQL with the spatial extensions PostGIS and pgRouting. Then, you can display and style your results in QGIS.
Resources
A docker image will get you started with a database environment with all dependencies. If you are unfamiliar with docker, follow the second link for a more manual setup process.
https://hub.docker.com/r/pgrouting/pgrouting/
https://drive.google.com/file/d/10GqWCiUuWonKi44BZwlsh3MFa4TYGR5K/view?usp=sharing
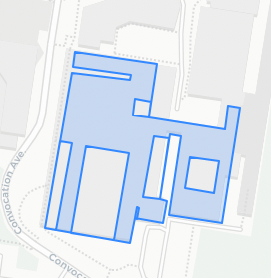
The spatial data for the indoor space in WGS84 includes a floor, geojson, obstacles, geojson, and poi.geojson.
https://drive.google.com/file/d/1SIOpnIuXM7zNSQsmUf4i5gc41IYxGJkf/view?usp=sharing
Links to relevant documentation.
https://docs.qgis.org/3.16/en/docs/index.html

**
POI
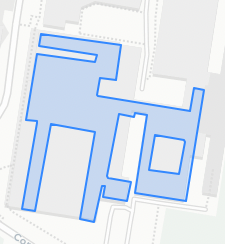
Obstacles
Floor plan
WGS84 - EPSG:4326
SELECT (St_dump(St_linemerge(St_node(St_approximatemedialaxis( St_buffer( St_union(St_difference(floor.geometry,
(
SELECT St_union(geometry)
FROM obstacles))), -0.00001 ) ))))).geom as the_geom
FROM floor,
obstacles
WHERE st_intersects(floor.geometry, obstacles.geometry)- Identifying Obstacles and Floor:
The code below uses two tables: floor and obstacles.
floor.geometry and obstacles.geometry is the spatial field of these tables, they’re both polygons
The st_intersects function checks if the geometries of the floor and any obstacle intersect.
- Difference between Floor and Obstacles:
St_difference(floor.geometry, (SELECT St_union(geometry) FROM obstacles))Subtracts the combined geometry of all obstacles from the floor polygon
- Removing slivers:

St_buffer(floor.geometry, -0.00001) creates a buffer around the floor polygon with a negative buffer distance of 0.00001 degrees (approximately 1 metre). That query will remove slivers.
- Obtaining a Centerline:
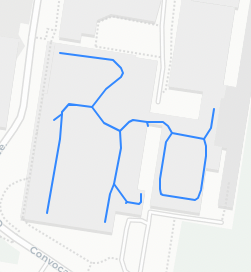
St_approximatemedialaxisextracts the centerline (or medial axis) from the result of the difference operation. This centerline represents the middle of the remaining floor space, which is walkable route.
- Converting Centerline to Nodes:
St_nodeextracts nodes (junction points) from the centerline retrieved in the previous step. This creates individual points representing the path of the centerline.
- Merging Neighbouring Nodes:
St_linemerge (ST_Dump(ST_LineMerge(ST_Nodemerges any closely spaced nodes from the previous step into a single line segment. This simplifies the centerline representation.
- Dumping the Merged Line as Geometry:
St_dump(St_linemerge(St_node(St_approximatemedialaxis(...))))).geomconverts the merged line segment resulting from the previous steps into a well-formed geometry object.This final geometry likely represents the centerline of the floor space, adjusted to account for the obstacles.
- Selecting the Geometry:
- The SELECT statement names the resulting geometry as the_geom.
Overall, this SQL query modifies the floor plan geometry by:
Clipping floor with obstacles - ST_Union(ST_Difference

Removing slivers - ST_Buffer
Extracting Walkable Lines - ST_ApproximateMedialAxis

and Splitting Lines - (ST_Dump(ST_LineMerge(ST_Node
SELECT St_shortestline((SELECT St_approximatemedialaxis(
St_buffer(St_union(
St_difference(floor.geometry,
(SELECT St_union(geometry)
FROM
obstacles))), -0.00001)) AS
the_geom
FROM floor, obstacles
WHERE St_intersects(floor.geometry, obstacles.geometry)
),
poi.geometry) AS the_geom
Shortest Lines from POIs to Walkable Lines - ST_ShortestLine

This SQL code snippet finds the shortest path between a point of interest (POI) and the walkable route plan.
- Finding the Shortest Path:
St_shortestline((SELECT ... ), poi.geometry)calculates the shortest line between the the_geom (modified floor space) and the poi.geometry (point of interest).
CREATE TABLE lines ( id serial PRIMARY KEY, the_geom geometry, source integer, target integer ); INSERT INTO lines
(
the_geom
)
SELECT St_shortestline(
(
SELECT St_approximatemedialaxis( St_buffer( St_union(St_difference(floor.geometry,
(
SELECT St_union(geometry)
FROM obstacles))), -0.00001 ) ) AS the_geom
FROM floor,
obstacles
WHERE St_intersects(floor.geometry, obstacles.geometry) ), poi.geometry ) AS the_geom
FROM poi
UNION
SELECT (St_dump(St_linemerge(St_node(St_approximatemedialaxis( St_buffer( St_union(St_difference(floor.geometry,
(
SELECT St_union(geometry)
FROM obstacles))), -0.00001 ) ))))).geom as the_geom
FROM floor,
obstacles
WHERE st_intersects(floor.geometry, obstacles.geometry)
Create Network Topology
Select pgr_createtopology('lines', 0.0001)
Select pgr_analyzegraph('lines', 0.0001)
Select pgr_nodeNetwork('lines', 0.0001);
Select pgr_createtopology('lines_noded', 0.0001)
Let’s break down these pgRouting commands:
pgr_createTopology('lines', 0.0001):- The first function builds a network topology based on the lines table.
- It adds a source and a target ID to each link (edge) in the network.
- The
linestable is the network table we’re working with. - The
0.0001is the snapping tolerance for disconnected edges (in projection units). - It also creates a vertices table named
<edge_table>_vertices_pgrand fill theidandthe_geomcolumns of the vertices table. - The
sourceandtargetcolumns of the edge table rely on theidof the vertices table.
pgr_analyzegraph('lines', 0.0001):- pgr_analyzegraph analyses the graph created by the previous step.
- It populates the vertices table with additional information:
cnt: Number of vertices in the edge table that reference each vertex.chk: Indicator that the vertex might have a problem.
- This information is useful for further graph analysis.
pgr_nodeNetwork('lines', 0.0001):- This function creates a node network based on the topology.
- It identifies nodes (vertices) in the network and their relationships.
- The result is a set of nodes with incoming and outgoing edges.
pgr_createTopology('lines_noded', 0.0001):- Similar to the first command, this function creates a network topology for the
lines_nodedtable.
- Similar to the first command, this function creates a network topology for the
Remember! These SQL queries depend on your network table’s structure and data quality. If any required columns are missing or if there are other issues, the functions won’t work.
For more detailed information, you can refer to the pgRouting documentation
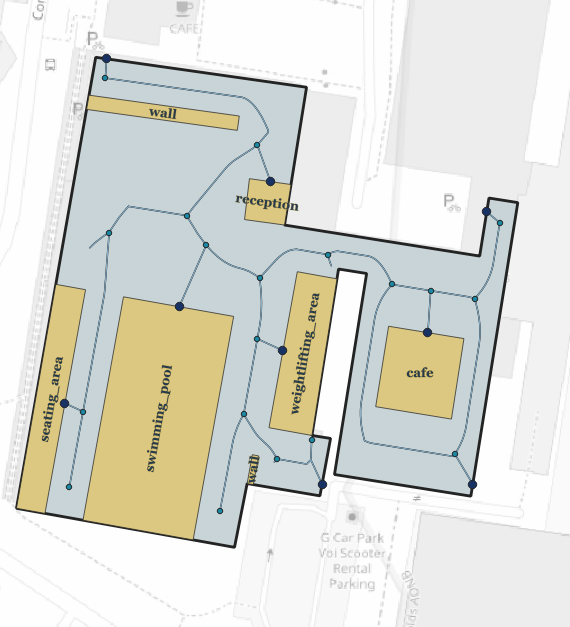
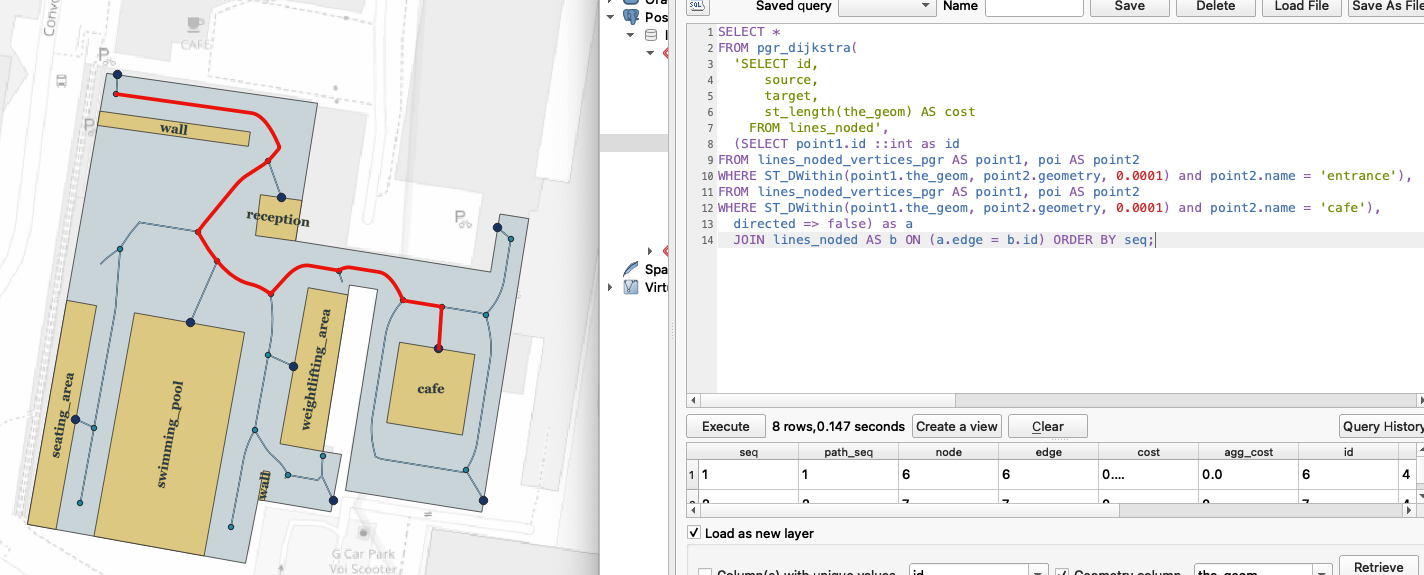
We run the following routing query on the database. The proposed shortest path is highlighted in red colour on QGIS. Feel free to test the algorithm with different queries and different nodes.
Conclusion
This case study uses the pgRouting algorithm for indoor mapping. Although our dataset is small, in real-world scenarios, datasets include multiple floors, expansive areas, and inconsistent data. Feel free to reach out if you have issues with tool setup or running queries.